Thursday, 4 January 2018

Mini Scrapbook Tutorial


Hi everyone,

It's been ages since I added anything to my blog, but I have been asked to do a tutorial for one of the facebook groups that I am in called SMASH*ing, Scrapbook, Planners & Paper & ALL Craft Fanatics!  There will be a new tutorial by a different person on a different subject each week, which I think is a great idea to get ideas and inspiration.

My plan for the next few months is to finish some of my half finished scrapbooks, so the one I started on was a mini book of our family holiday to Wiltshire in July. I had great intentions of getting it done as soon as we got back but I only got as far as getting the book pages together and printing the photos. For the front and back covers of the book I am using dividers that came with my Simple Stories Project Life album as they are quite thick. I used the size of these and the holes as a guide for other pages inside, which I made using random patterned pages from my stash. I will then use rings to hold it all together.


So this is what I started off with for one of my double page spreads about the day we spent at Cotswold Wildlife Park...


The title is from the paper bag we got given when buying something from the shop and the little lion image is from a tourist map of the area. I used this map to cut out lots of little images for the different places we went.

I also had a postcard with a camera on it to add in as a smaller page as I like to have a few different sized pages for interest. This would also enable me to add in an extra photo on the other side. 


The next thing I did was to gather my supplies which were mostly from Studio Calico Kits. I didn't have a lot of time and these come in neat little zip bags so were easy to get to without trawling through my stash. I picked out anything that would go with the colours or the theme of the pages. I like to have a variety of shapes of embellishments and textures on my pages. Here are a few of the things I picked out...


After rearranging the photos and removing one entirely (as there wasn't enough space), this is what I came up with...


I added a doily behind the photos on the left hand page to break up the busy pattern of the background. On the right hand page, I added some phrase stickers, a wooden butterfly and a squirrel charm. I also used a journalling card to write about the day. I very rarely keep up with my scrapbooks so I keep a diary and use that to write my journalling when I finally get around to it!


I then looked again at the camera postcard and decided that the yellow didn't go with the more muted colours. I liked the size of it however, so found another piece of card, cut it down to size and added a stamp...


On the back I added a photo with a wooden heart and a title and punched holes using my cropodile. I liked the gold letters but only had one letter 'i' left so I improvised and cut off the bottom of a letter 'j' instead, which I think I got away with!


 These are the final pages with the smaller page in the middle...


I was pleased with how they turned out and pleased to have made a good start on this album. I now have to add the date to the gold "Today" tag when I have found my date stamp!

I hope you enjoyed my tutorial and that it gave you a few ideas for your own pages.

Katie x

Friday, 27 March 2015

Welcome Little One

Hi everyone,

Well here is a new baby card I made recently for the arrival of a little girl. For the main image I used a Forever Friends sticker by DoCrafts and used stickles to add some sparkle to the edges of the towel. I then matched that with pastel colours - mainly pinks with dashes of other colours too.


The embossing folder that I used is a fairly small one, as I use a cuttlebug, so I embossed the white piece of card twice and hid the join underneath the strip of pink stripy paper. As the pattern is random, it is impossible to tell. I then added a few tiny pink star buttons randomly over the card.


I would like to enter this card into the Crafting Cafe Challenge "Welcome Little One"

I hope you like this card and thanks for looking. 

Katie xx
 

Little Boy Cards

Hi everyone!

Today I want to share some cards I made for little boys' birthdays. I have never had to make cards for children before, so this was completely new to me! I really enjoyed the challenge though and it was nice to make something different.

When starting I knew that I wanted to use bright colours and keep the cards quite simple as they were for young boys.

The first is a first birthday card. I used the main image of a lion, which I cut out from some wrapping paper. You can get so many nice images from wrapping paper at a good price and you often get lots of different images on one sheet. I kept the rest of the card simple with a plain blue background and different colour blue stars. I picked the colours to match the "Happy Birthday" banner that I used. Obviously I had to include the number 1 too as it's such an important birthday!


The second card is for a boy's third birthday. I used more colours on this card, but again used wrapping paper for my main images of a boat and a bus. I then added a large number 3 and some stars in colours to match.


I hope you've enjoyed seeing my cards and thanks for looking.

Katie xx

Friday, 9 January 2015

Flower Card

Hi everyone,

Hope you all had a fab Christmas and New Year. I managed to make nearly 60 Christmas cards and had to do a few last minute quick ones too! I am still working on my December Daily at the moment. Hoping to get that finished soon so that I can get on with thank you cards. 

Here is a birthday card that I made for my Mum in December. It was a nice change from all the Christmas cards!

I stamped flowers onto patterned paper and cut them out before arranging them on the embossed white card. I outlined this using a black rectangular glitter peel off, which I think makes it stand out. I like the black lines against the colour and pattern of the papers used. 

Thanks for looking!

Katie x

Wednesday, 5 November 2014

First Christmas Cards

Hi everyone,

Like many crafters at the moment, I am frantically making Christmas cards! I think I've made about 38 so far, so I am getting there! Hoping to have them all done and dusted by the end of November, so that I can get going on my December Daily and catch up with the Smashbook I'm doing for my little boy's first year. 

So here are the first few Christmas cards I made. I made them using my new Card-io stamps and really enjoyed doing something different. I think they are quite simple but effective.


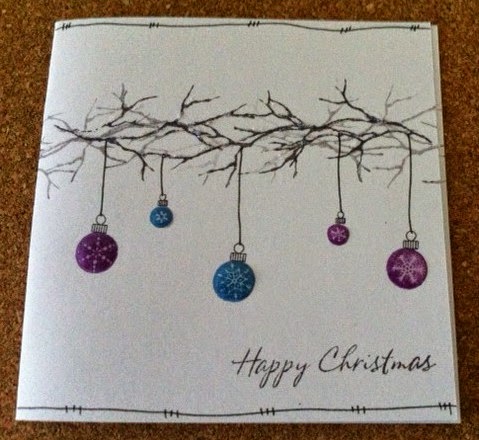
For these cards, I used the more traditional Christmas colours, so red and green. I also added glossy accents to the baubles to make them 3d. 


I tried some more "modern" colours for this one. I do like blues and purples for some Christmas cards and think they work well with the baubles here. 


Thanks for looking and I hope you like these cards.

Katie xx

Saturday, 11 October 2014

Craft Show Goodies & Card-io Stamps

Hi everyone,

Well recently, my mum and I had our annual day out together to the ICHF Craft Show at Westpoint in Exeter. Despite both of us feeling a bit under the weather we both had a great day and bought some lovely things. This is what I bought:


A lot of what I buy now at the show are the general things like glue, stamping card, ribbons, adhesive gems/pearls and a few bits for Christmas. This year I bought a few things from the DoCrafts Bellissima range. I love the colours and the papers in the pack.

The most exciting thing I bought was some little stamps by Card-io. My mum has been using these for years especially at Christmas, but this is the first sets I have bought. They always have a fab stand at the show too, with a lady doing demonstrating and loads of gorgeous samples.


I was keen to have a go with these, so here is the first card that I made using them:


I made this card by stamping the branch and other flowers and using inkylicious brushes to add some colour. I then stamped the butterflies and sentiment and added the border around the edge of the card.

Thanks for looking and I'll be back again soon with some Christmas cards I have been making using these stamps.

Katie xx


Monday, 22 September 2014

A tortoise and a tractor!

Good Evening!

This year for hubby's birthday I had to make 2 cards, one from me and one from our little boy! I struggled for ideas to start with for a card from me this year. I wanted to use some things I hadn't used for a card for him before but didn't have anything new! I therefore had a rummage and found this cute little tortoise stamp that I have had for years.


I paired the image with some papers from the Michael Powell range from DoCrafts and kraft card. The embellishments were all bits and pieces from my stash. 


For the card from our little boy I saw a perfect sticker by DoCrafts which was a Forever Friends Bear on a red tractor. The leaves and "You're the Best" stickers were from the same set. I mounted them on red striped card with a border of plain red card to match the tractor.


Thanks for stopping by. I would like to enter the tortoise card into the following challenges:
I'll be back again soon!

Katie xx